Archive for the 'Home Improvement' Category

Destruction Has Begun

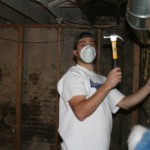
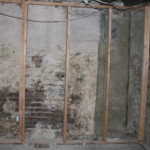
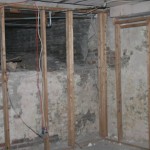
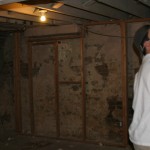
Sunday afternoon we spent some time working on the basement project that I mentioned here nearly two years ago. I have multiple different plans drawn up in SketchUp, but prior to this day had done very little actual work toward achieving my goal. Well that has changed, and I’m posting these pictures to force myself into keeping regular updates going on the project. I’m trying to dedicate at least one night a week to the project, hoping that eventually I’ll start having fun with it and put in even more time. Right now the dirty work is not much fun at all.

So here are a few pictures that Kim snapped on Sunday. You’ll see that I am busy tearing down some previous framing that was not done very well. I figure that I’ll want my walls to actually stand up for years to come, so redoing them is the only way to go. Once we get all of the wood out of the way, we’ll be removing any loose material from the walls and then resealing them with some products I picked up from Home Depot. You’ll also see a photo an area of the floor that is not level with the rest of the basement, which I am already in the process of filling in. We are slowly making some progress and I hope I’ll be able to post some more pictures next week with some visible changes being made.

Sorry if some of the photos are a bit blurry, the camera was set to manual focus and Kim didn’t realize that.

Buying Fifth Avenue

Over time, we’ve been slowly replacing some of our hand-me-down furniture items with some new stuff of our own. Our most recent purchase is a new counter height dining room table, that was just delivered yesterday. It was nice having my parents around so they could help unwrap everything and get it all setup. This new table provides much more space than the garage sale table we bought years ago. Now we can finally seat more than two people for dinner. So far I’m really happy with the purchase. I’ll try to get some updated house pictures online soon, things are slowly being updated.

Always Shake It

We’re debating putting new siding on our house. We have a dormer that is in terrible condition and is the primary driving force behind this project. But while we were thinking about it, the back of the house also needs some work to repair and repaint the wood shake siding that is on there currently. So instead of doing that work, why not have new siding put onto the back of the house? And then I figured if we are doing the back we might as well do the front in order to keep things consistent. So now we’re looking at getting all of the siding redone.

The one question that still remains for me is if it’s worth it. It’s fairly expensive project when looking at doing the whole house, even when using products like vinyl siding. Of course we don’t want to destroy the integrity of the older home, so we’re only considering siding that still has a wood shake look to it. Often, you can’t even tell this stuff is fake when it’s up on the house. But I’m still not 100% sold on the idea. Anyone have any opinions on vinyl siding, or any other products?

Ready For Spring

As I mentioned last week, we’ve got lots of spring activity going on around the house with the incredible weather Denver has been having. In addition to the bulbs in the back coming up more and more with each passing day (no blooms yet), the flowers I noticed last year in the front yard are back as well. When we redid the front planting beds, I moved the bulbs around a little and spread them out some, but they still look really cool and are in full bloom. The purple weeds in the yard are back as well, though I didn’t actually remember seeing them before until I checked the entry from last year. I guess these blooms fade pretty quickly and aren’t seen the rest of the spring and summer. I want to put down some fertilizer on the yard, so maybe I can find something that will take care of the weeds too. I honestly have no idea when I should spread something like this, does anyone have advice?

Never Ending Garage Project

For the past couple of months I’ve been working on fixing up the garage. Once we had the roof redone on the house and the garage, I finally felt like I could put a little extra work into it. So first, I remounted the garage door opener so it was more sturdy and Kim would no longer feel like it was going to fall on top of the Jetta. From there, I patched multiple holes in the garage floor. I tried one type of patch first but found it really hard to work with. So after visiting the local hardware store again, one of the very helpful salesmen directed me toward a much better product. This time I was able to smooth the patch out and fill in the holes very easily. After a couple of weeks, all of the holes were filled and I could finally start using the garage again.

That was until the other night when I left for hockey. I pressed the opener and the garage door attempted to open, but the rubber weatherstripping on the bottom of the door was apparently frozen to the concrete floor. The door still tried opening anyway, until I stopped it, but the damage was done. The weatherstripping was completely ripped from the bottom of the door except for a small piece on each end. And during the struggle, part of the door was actually bent. Fortunately the dent is pretty hard to notice, but I tried bending it back anyway. After another visit to the hardware store I returned with some very powerful adhesive that I used to put the weatherstripping back in place and put the door back together. I haven’t tried opening the door yet, but I’m hoping the next time I do all will be well. Mental note to myself: when shoveling snow don’t forget to open the garage door and shovel there as well.

Brick Wall Hangers

Has anyone every hung anything on a brick wall before? As you may or may not know, our house has a number of exposed brick walls, and I’d like to hang some things on these walls. I’ve been researching my options online, and I think I will have to drill into the wall and put special hooks into the wall for this. The only question that remains is if I should put the hooks in the bricks or into the mortar. I’ve read differing opinions online, and was hoping someone had first hand experience.

Raising The Roof
11205
11220

It only took a day and a half for the roofers to completely remove the old roof and install the new one. It took me over a week to get pictures of the completed project online. Anyway, to the left is the before view and to the right is the after.

11208
11226

I think it looks great, and I’m really glad we went with the dark color. Here is another before and after from the back of the house. Clearly, we have a little painting to do now, since some old siding is now exposed.

I also want to replace the red shingles on the dormer walls in the top pictures with some new siding. I haven’t decided if we’ll go with vinyl or some wood shingles to tie in with the rest of the house. Hopefully this is something that we can do ourselves. Hiring out projects is getting a little pricey. All pictures from the roofing project can be viewed in this album.

Latest Project: New Roof
11205

Today we are starting yet another home improvement project, but just like the windows before, this is not something we are doing ourselves. We have a crew from The Premier Roofing Company doing what they do best, installing a new roof on our house. This was something that we knew needed to be done when we bought the house, we were just waiting for a good time to do it. Well, the time is now, especially before winter really sets in.

11214

It’s been a little noisy so far today, as the crew ripped off the old roof all the way down to the frame removing multiple layers of shingles along the way, including possibly the original wood shake shingles. Now they are busy installing plywood decking to the frame, which is a much quieter process. Things are looking great so far and I can’t wait to see it all done with brand new shingles on the entire house. I’ve added some before and current pictures in this album, and will continue to take more as the process moves along.

How I Spent My 4th

I just finished sanding and painting the trim along with hanging blinds on all of the windows we had replaced a few months ago. We tried to get the blinds from Home Depot and Lowes, but neither of them could make them in the store or do it for a good price. So instead we found blinds.com and ordered two inch faux wood blinds for incredibly cheap! It really completes the project and should hopefully provide cooler temperatures in the house to combat the heat wave we’ve been having recently. As always, I added some pictures of the project for you to enjoy. My vacation starts now, and we are off to North Carolina tomorrow! Happy 4th of July!

Everyone Loves Our Work
8430

I decided to snap a couple more pictures of our ever improving front yard today while I was out watering. I still have to mulch some areas, and decide how I want to edge one particular area. But the porch is completely re-stained and we even have some grass growing. It’s quite a change from what it looked like when we first moved in, but it’s definitely a good change. Just look at these pictures from before (especially this one) compared with how things are looking now in this photo album.

Even the neighbors are taking advantage of the good looking yard we have now by putting their house up for sale. Anyone want to join us out in Colorado?